Tuesday, March 20, 2012

Souvlaki & Tzatziki sauce

Montreal is a great city :) One of its best assets is the food culture and diversity. You can find any type of food on any street. David and I miss this aspect of Montreal. In Spain, people are really proud of their food culture (with reasons) but they have a hard time embracing international food. Younger generations are more open to this concept and will venture more out of the Spanish spectrum but the older one is really hard to convince.

Montreal has a very big greek culture. There are so many greeks there! This can only mean one thing: amazing greek food on every street corner (depending on the neighborhood, most commons: Parc X, Chomedey or St Laurent). Who does not enjoy a gyro or souvlaki pita with tzatziki. :) David and I have a pending appointment at Marathon Souvlaki in Laval :) Can't wait! We went to a greek restaurant last week and although the food was great, they didn't have the typical souvaki pita. It was a more refine restaurant... and the tzatziki just wasn't the real deal. Mind you, the yogurt was amazing but I have never seen so little cucumber or garlic in a tzatziki. Oh well, it subsided our thirst for greek, but left us wishing for Marathon souvlaki :)

So, after that little trip leaving a urging taste of garlic and cucumber in our mouths, guess what we had for supper on saturday: Chicken Souvlakis with Tzatziki :) David and I were eating the tzatziki like no tomorrow. Our friend was there and she loved it as well.

Souvlaki is marinated meat (chicken, pork or lamb) in oregano, lemon and oil mostly. The meat comes out amazing :)

Chicken Souvlakis and Tzatziki


Ingredients

500grs chicken breasts
1 onion
4 garlic cloves
1 tbsp oregano
1 tbsp lemon juice
4 individual natural greek yogurts
2 tbsps oil
1 tsp of white wine vinegar
2 cucumbers
1 tbsp fresh dill
salt and pepper
skewers
oil

The day before, cut into cubes the chicken breasts and slice the onion and 2 garlic cloves. Place them in a ziploc bag and add the oregano, oil, vinegar, pepper, garlic cloves and onion. Mix well. Marinade in the fridge overnight.

Preheat the oven at 180C.

For the sauce, drain the yogurt from excess liquid. Normally you use a cheesecloth but since I don't have any, paper cloth works just fine. I place the papercloth in a colander over a bowl and pour the yogurt. Works great. You can leave it overnight or only a few hours. I left it about 1 hour since I didn't have much time. My tzatziki was a tiny bit more liquid than usual but the taste is the same.


In the meantime, remove the chicken from the ziploc.


Make skewers with the chicken. Place on a oven dish. (If you have a BBQ, please use it! Tastes awesome!)

ETA: I cooked the skewers in a heated pan last time and the taste was a lot more moist than in the oven. So, I rectify the cooking process: cook your souvlakis in the pan (for those that do not have a BBQ)! :)

Since I don't have a BBQ, I place them in the oven at the highest height.  Cook the chicken souvlakis for about 15 minutes.

While the chicken is cooking, finish off the sauce. Honestly, the sauce can be done the day or 2 before. Helps the flavors to blend together. Remove the yogurt from the colander and place into a bowl.

Shred the cucumbers and the 2 remaining garlic cloves. The smaller the pieces, the better. Cut the dill.

Add the cucumbers, garlic, dill, salt and pepper, a bit of oil and a drop of lemon juice.


Mix well. Taste and rectify if necessary.


Your chicken should be ready by now. If you want to give it a grill look, broil it for a few minutes before removing.


And there you have. A great greek meal to satisfy our hunger. A true delicacy made from my little kitchen. Hope you enjoy it as much as we did!

Lasagna

So I told you I was making homemade lasagna right? The only missing ingredient that was left to prepared was the lasagna noodles. 2 years ago, David gave me for my bday my awesome pasta machine! He got me an eletrical one since it had more pasta molds that a manual machine (basically can only make flat pasta). I have used my new toy quite often but the clean up part usually unmotivates me... It can be a LOT easier to just pop open a bag of premade pasta!


 So, back to tonight. I was sure that I had a lasagna fit for my machine... low and behold, after taking it out of the box, and setting it up... out of the 10 I have... none for lasagna! I have a lasagnete one but it is not wide enough. So only one solution left. Taking out the rolling pin! That's right, I worked out my arms people :) but it was all worth it.

Lasagna noodles


Ingredients:

2 eggs
2 cups of flour
1 tbsp of olive oil
1 pinch of salt
1 tbsp of warm water if needed


 Place the flour on the cutting board (or countertop) making a volcano (mountain with a hole in the middle). In that hole, you break the 2 eggs and mix them lightly in order to break the yolks. I was going to take a picture here but I suffered from technical difficulties! My hole was not big enough and my second egg started overflowing as a real volcano would do! So I desperately tried to catch it and therefore my hands became part of the egg and flour mix... basically a goue! I couldn't see my fingers from all the dough that was on them! Trust me, I was laughing at myself for being so stupid, thankful that David wasn't home yet to laugh at me, and my hands were quite a sight to see. Quick trick if your hands become full of sticky dough, rub them together, the dough will stick to each other and fall off your hands. Helped a lot in my case. So... please excuse the lack of picture for this step!

So, the real method is to slowly add the flour from the sides into the eggs and start mixing the dough. In order to not get sticky hands, try not touching the eggs until they are nicely mixed.

Knead the dough as if it was bread for about 15 mins. Add the water if it is too dry.

When the dough is nice and kneaded, form a ball and refrigerate from 30 mins to 1 hour covering it with a damp cloth. This gives time for the flour to set. Really helps a lot! I never did this step before but it does make a difference.


So when the dough has rested, take it out and start rolling it.

 Until you get a nice thin layer. I cut my ball into 4 pieces since my board is too small for the whole dough.


 When I got a decent thickness and size, I cut them lengthwise. I was laughing at how different my pieces looked but since I don't have a hand pasta machine, that's the best I could do!


 Final count. 12 "pieces"
 So there you go. Lasagna noodles ready to roll! :)

Since I won't be cooking my lasagna until tomorrow I actually pre-cooked my pieces in order for the egg to not go bad on me. Fresh pasta calls for about 1 to 2 mins in the boiling water, but I just left it 30 sec as it will cook in the lasagna again tomorrow. I don't want it to be mushy.


Actual lasagna recipe

Making lasagna involves different steps. Actually, there isn't any authentic true italian lasagna. It is a dish that varies from region to region and has evolved over the years. In italia, you can barely find a ricotta and meat lasagna as in America it is almost a must do. So it really depends on what you prefer and how you like it. I do a mix of a few recipes and mostly do it as my mom does it, who learned it from her nonna. It is a simple recipe but does involve many different steps and can be time consuming. It is all worth it in the end though!


Ingredients:

Meat tomato sauce (recipe below)
Bechamel sauce (recipe below)
12 to 15 pieces of lasagna noodle
oil
pecorino romano cheese
mozzarella cheese
ricotta and spinach mix (recipe below)

I'll explain this recipe by section, as I find it is easier to do so.

Meat tomato sauce

Ingredients:

500gr of ground beef
1 small onion
2 garlic cloves
1 780gr can of whole tomatoes
2 400gr tomato sauce cans
spices (fennel, italian spices, basil, parsley, salt, pepper)
1 tbsp of sugar
1/2 cup of white wine
oil

Mince onion and garlic cloves.


Add oil to a large pot and heat. When ready, add the onion and garlic. Sweat for a few mins. Add meat and cook for about 8 mins until brown.


Add white wine and reduce (usually takes a few mins). I just love adding wine to sauces as it gives it this fruity taste. :)

Add the tomato sauce and whole tomatoes roughly diced (I don't add the tomato juice from the whole tomato can... just too watery). Add the spices.


Let simmer for about 1 hour. I actually put the lid on and remove it towards the end in order for the water to evaporate. In America, tomato sauce usually involves tomato paste. Since I don't have any and it is not that common here, I use tomato sauce and let it reduce at the end (basically the way tomato paste is made). Otherwise the sauce is too liquid and the lasagna is hard to cut and stay together.

Bechamel sauce

Ingredients:

3 tbsp butter
3 tbsp flour
pepper
1 cup of hot milk
1 tsp of nutmeg

Heat butter until melted. Add the flour to the butter and whisk until a roux forms.


Add slowly part of the hot milk. Whisk. Add the remaining milk and pepper (nutmeg too if you have). It will form a dense mixture.


Ricotta cheese mix:

Ingredients:

2 eggs
1 cup ricotta
fresh parsley
100gr frozen spinach, thawed

Mix eggs, ricotta and parlsey together.


Take the spinach and remove the excess water by squeezing it in your hands or using paper towels. This is really important otherwise your lasagna will be watery and taste too much like spinach. Add spinach to mixture.


Assembly

So here is the fun part! Making the lasagna! I love taking pictures and seeing the slow evolution of the final product :) So please excuse the excess of pictures here.

Brush oil in your oven lasagna dish.

Add 1/3 of the meat tomato sauce and layer it.

Add lasagna noodles as best as you can to cover the sauce. The trick is to overlap them slightly but since I was short on noodles... I did my best to cover the sauce with my ackward pieces.

Add ricotta and spinach mixture.

Add another layer of noodles. Best looking one for me here!


Add the bechamel sauce layer

Add another 1/3 of the meat tomato sauce

Add the last noodle layer and the pecorino romano cheese.

Add the tomato sauce and the mozzarella cheese. I used a mix with emmental because it browns better in the oven :) I would have used my homemade mozzarella but there just wasn't enough of it!

So there you have it! A yummy homemade lasagna! I'll post final cooked pics after lunch time.

Thanksgiving Turkey and Pumpkin Pie

Ok. I know I am getting pretty bad at keeping track with my blog. This week has been pretty hectic as we have a friend in the hospital and we didn't get much "home" time. I really didn't want this post to take such a long time to actually get posted, so today it has to get published! :)

A bit of North American culture to my fellow Spanish readers. Yes, Canada has its own Thanksgiving. Yes, I swear. And No, it's not the same day as the American one :) Sorry if it sounds stupid for most of you but you would be surprised by the amount of people that do not know this bit of information. The American Thanksgiving is celebrated on the 4th Thursday of November as the Canadian one is on the 2nd Monday of October. The logical explanation behind the different dates is the location; the USA being south, their harvesting season finishes later on, which brings on the later date. The Americans usually celebrate it "a lo grande" a lot more than us Canadians. Yet, I prefer our date in order to have more time in between holidays. To each their own :)

Back to the kitchen. The main menu for both is usually the same: Roasted turkey, stuffing, mashed potatoes, veggies, cranberry sauce, pumpkin pie... I skipped the cranberry sauce as neither of us eat it and you can't really find that fruit here. I had invited friends over that were pretty curious about this famous North American tradition. Let's just say they left amazed :)

First of, the turkey. I never really liked turkey as I am not a fan of dry white meat. My Mom would always give me part of the leg. Thanks Mom! I was reading 2 years ago preparing myself to make my turkey and read that brining makes a huge difference. I decided to give it a try. Well, I am never going back! Brining is the key to a moist and juicy turkey. No doubt about it!

I have bought turkeys at my poultry store at the market before and everytime I get the surprised look. You are seriously buying a whole turkey and not having it chopped up? You will roast it whole? How do you cook it? Ahhh, it's like in the American movies?? Haha! The people that work there know me well and always laugh when people give me the "look" and start questionning me. Last Christmas, I had the whole lineup listening to the cooking methods of a turkey! It was pretty funny, the employees were waiting for the customers to keep ordering but they were all so absorbed in my explanation! It sure makes for good stories to tell :)

So here goes my roasted stuffed turkey recipe:

Brined, Stuffed & Roasted Turkey


Ingredients:

Brine:
8 liters of water
2 cups brown sugar
2 cups salt
rosemary
thyme
2 oranges quartered
2 lemons quartered

Stuffing:
500grs ground beef
3 celeries
1 green onion
4 bread slices
2 eggs
1/2 cup parmesan cheese
1/2 nuts (if desired)
cumin
salt
pepper
parley
oil

6kg turkey
butter

In a large bowl or bucket, mix the brine ingredients. Add the turkey and brine for about 24 hours.


Remove the turkey from the brine, rinse well under cold water and pat dry with paper towels.

Preheat your oven at 180C.

Right when you are about to start cooking the turkey, prepare the stuffing. My Mom always told me to start cooking it before stuffing just to make sure you have no cross contamination.

Dice the green onion and celery.

Add oil to a pan and heat. When ready, add the veggies.


Sweat for a few minutes and add the meat.


Cook until it is still a bit pink.

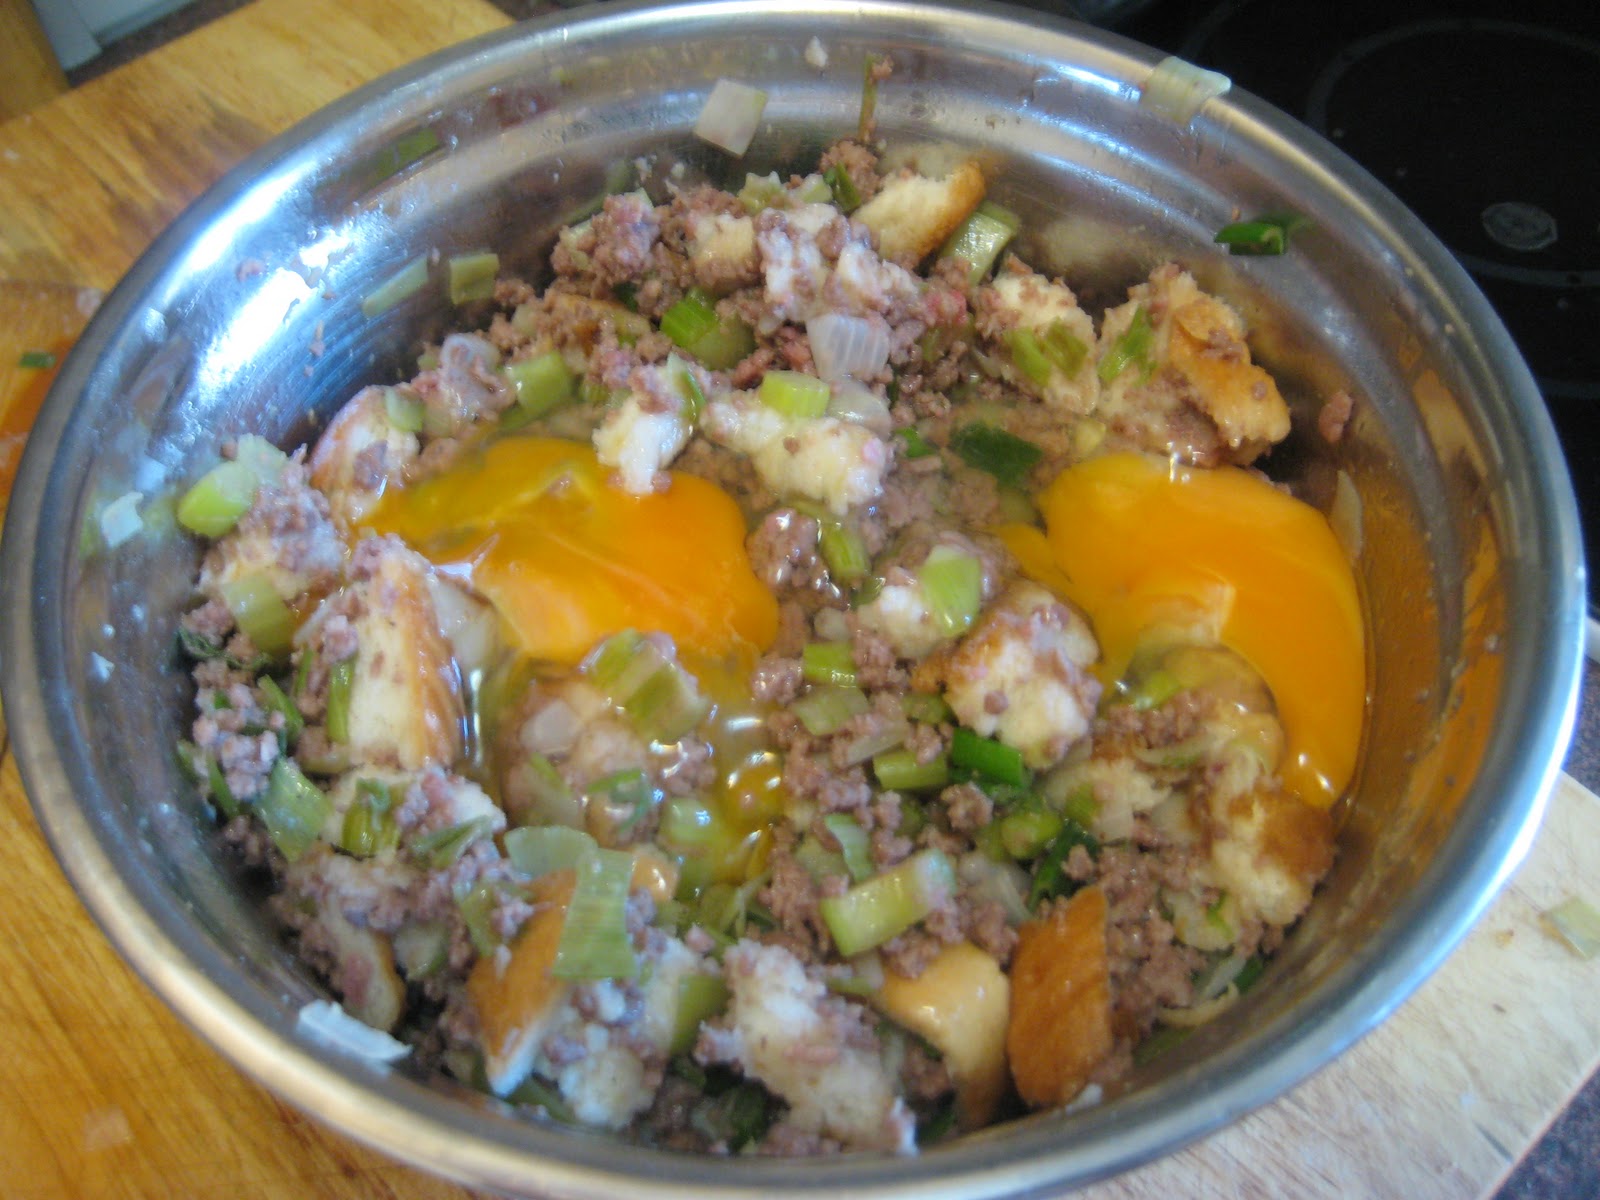
Transfer to a mixing bowl.

Add parmesan cheese, parsley, cumin, salt and pepper.


Roughly break apart the bread and add to the mixture.


Mix well.

Add the eggs.


Mix well.

Using a spoon (or your hand), fill the cavity of the turkey with the stuffing.


Sew the opening shut.


Now, your turkey is ready for some basting!

Melt some butter in the microwave and brush the turkey completely with it.

Place the turkey in the roasting pan breast down to make sure it stays moist.

Add a bit of water to the bottom of the roasting pan and pop in the oven.


Instead of adding water and basting the turkey with it, I grabbed a bit of turkey fat and meat and heated it in water. It make a broth and I used that to roast it in. If you don't have any, use some chicken stock and it works great as well.

Baste the turkey every 30 minutes with about 1 cup of broth and always make sure that it has liquid at the bottom of the pan.

Cook breast down for about 2 hours.

Flip the turkey over to get a nice roast on the breast side.


Cook for about 2 more hours breast side up. You know it's cooked by the skin at the legs. If not, you can use a meat thermometer to check it.

Remove from the oven and let cool 20 minutes while covered.

Cut the turkey open and remove the stuffing from inside.


And there you have it!

Make some mashed potatoes and some greens (I made green beans).

Use the pan juices to make the gravy (make a roux and add the pan juices slowly). Result:


Serve at the table and carve the turkey there as well. Makes for a nice show. David is the carving expert at our house, like my Nonno is at our family gatherings :)

And a few pictures of the table (turkey, green beans, mashed potatoes, gravy, brie with wild fruit sauce and stuffing).


Close up of the dishes.


And the crowd patiently awaiting to get served! And a proud host on the right :) Me!


and a typical thanksgiving plate (minus the cranberry sauce):


And now, even though your stomach and eyes are full, dessert time!

Pumpkin Pie


Ingredients:

1 can of pumpkin puree
1 cup of evaporated milk
2 eggs
3/4 cup brown sugar
1 tsp cinnamon
1/2 tsp ginger
1/2 tsp grounded cloves
1/2 tsp salt
1 cup flour
55grs frozen butter
pinch of salt
3 tbsp cold water


In your mixer, add the flour and salt.

Cut your frozen butter into cubes. Add to the flour.


Mix until it forms a breadcrumb texture.


While mixing, add the water slowly until it unifies. Stop mixing. You really have to be careful to not overstir it because the butter will get softer and it won't be a crispy crust.


Remove from the mixer and cover with saran wrap.


Let rest in the fridge for about 15 minutes.

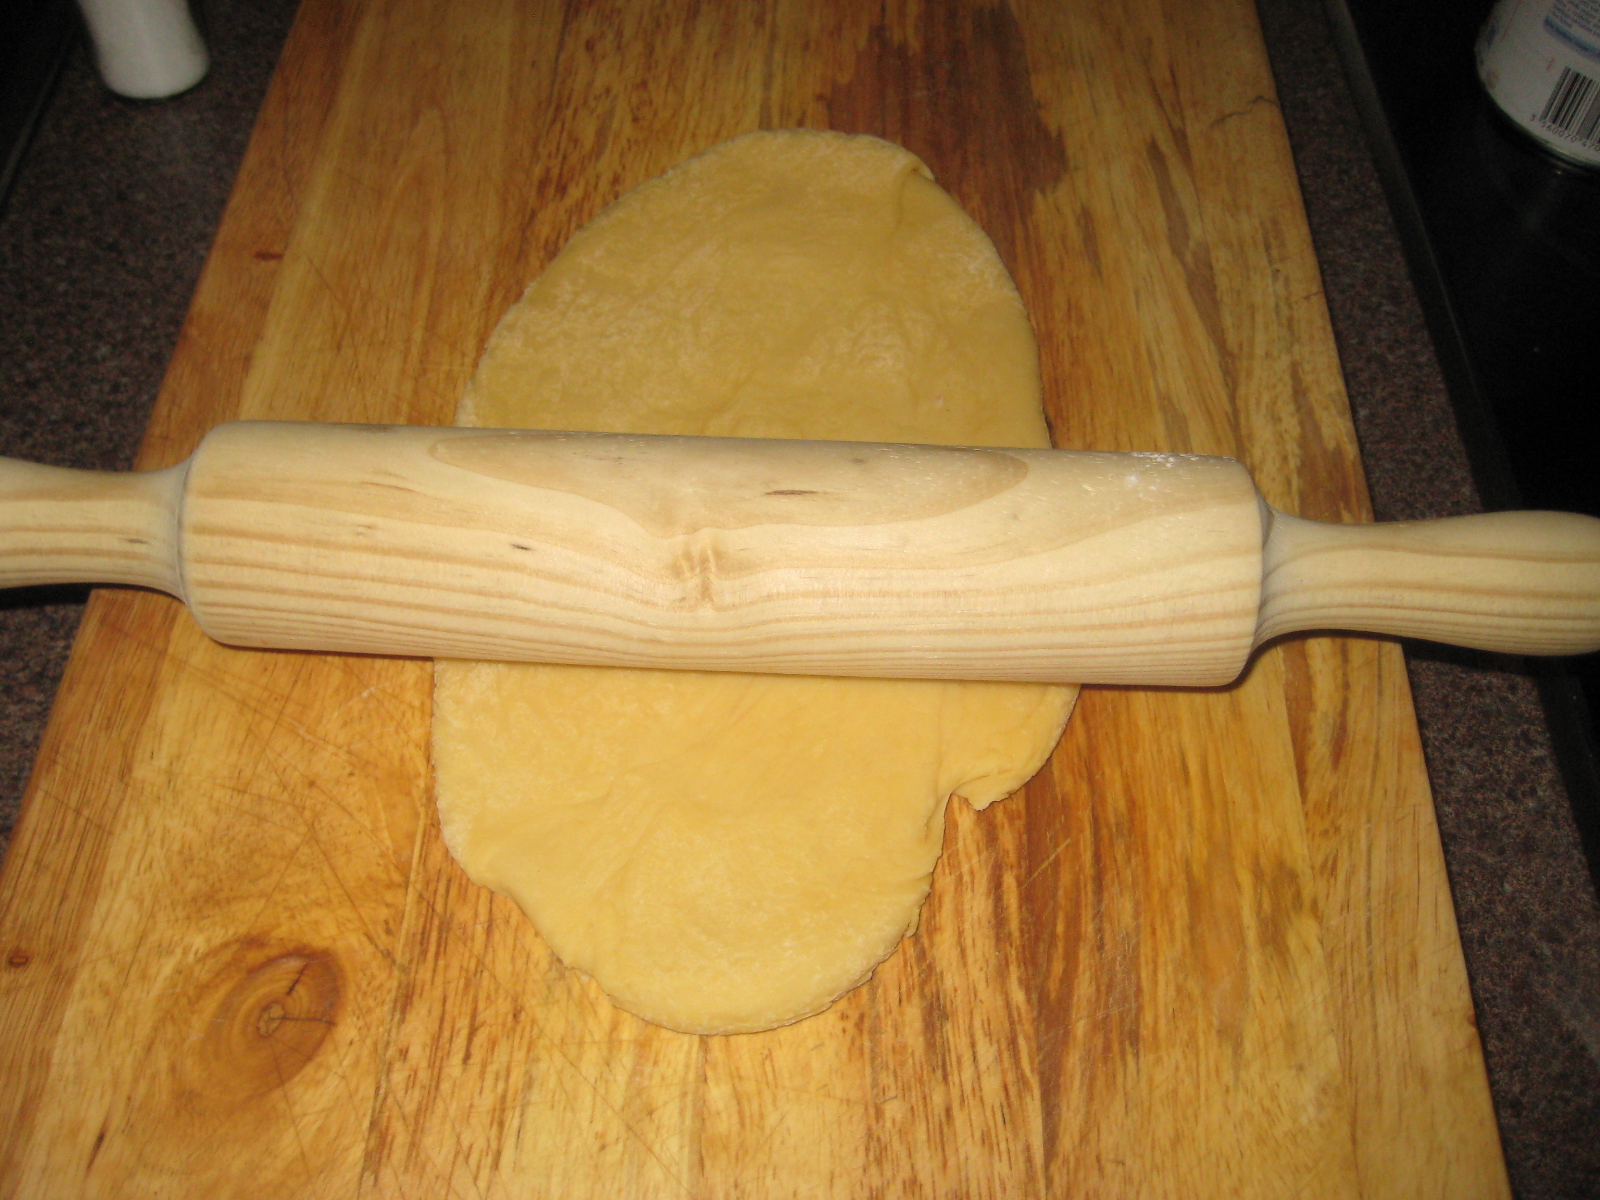
Place your dough on a floured surface and roll it out until you form a nice pie shape.


(As you can see, I had made double the recipe to have some extra dough, turned out, I did well... I needed that dough for this one... you'll see why later on!)

Place in your pie dish.


Ok, here is the important note. If you cook a pie blind before adding the fillings... leave the pie overlapping on the sides. Otherwise, it will shrink and will look horrible. I learned quicky. Lucky me, I had made an extra batch of dough and I did not cut the crust before blind cooking it.

Blind cook for about 10 minutes.


In the meantime, prepare the filling.

In a large bowl, mix the pumpkin puree, sugar, salt, ginger, cloves, cinnamon, eggs and evaporated milk.


Pour into the precooked pie shell.


Cook at 180C for about 40 minutes (checking with a toothpick to see if the middle is cooked). Cut off the excess pie crust :)

Here is my friend Chus being a pro pie cutter.


And there you have it! A perfect Thanksgiving Dinner kilometers away :)

Happy Thanksgiving everyone!